Tuesday, 29 July 2014

c# example – Datetime Days in month

Sometimes we need to know programmatically that how many days exists in current month from a date time object. or how many days exists in any specific month. we are know that in july there are 31 days and in june there are 30 days. but how can we get it by .net programming? there is a simple solution. here we usees a date time function method name DaysInMonth. pass the two argument year and month number. it will output the exact days number.
datetime-days-in-month.aspx :
  1. <%@ Page Language=“C#” AutoEventWireup=“true”%>

  2. <!DOCTYPE html>
  3. <script runat=“server”>
  4.     protected void Button1_Click(object sender, System.EventArgs e)
  5.     {
  6.         //initialize a datetime variable with today
  7.         DateTime today = DateTime.Today;

  8.         //get number of days in current month
  9.         int numberOfDays = DateTime.DaysInMonth(today.Year,today.Month);

  10.         Label1.Text = “today : “ + today.ToLongDateString();

  11.         Label1.Text += “<br /><br />days in current month : “;
  12.         Label1.Text += numberOfDays;
  13.     }
  14. </script>

  15. <html xmlns=“http://www.w3.org/1999/xhtml”>
  16. <head id=“Head1″ runat=“server”>
  17.     <title>c# example - datetime days in month</title>
  18. </head>
  19. <body>
  20.     <form id=“form1″ runat=“server”>
  21.     <div>
  22.         <h2 style=“color:MidnightBlue; font-style:italic;”>
  23.             c# example - datetime days in month
  24.         </h2>
  25.         <hr width=“550″ align=“left” color=“Gainsboro” />
  26.         <asp:Label
  27.             ID=“Label1″
  28.             runat=“server”
  29.             Font-Size=“Large”
  30.             Font-Names=“Comic Sans MS”
  31.             >
  32.         </asp:Label>
  33.         <br /><br />
  34.         <asp:Button
  35.             ID=“Button1″
  36.             runat=“server”
  37.             Text=“get number of days in current month”
  38.             OnClick=“Button1_Click”
  39.             Height=“40″
  40.             Font-Bold=“true”
  41.             />
  42.     </div>
  43.     </form>
  44. </body>
  45. </html>

How to change asp.net Button width programmatically

How to set, change Button width programmatically:
  1. <%@ Page Language=“C#” %>

  2. <!DOCTYPE html PUBLIC “-//W3C//DTD XHTML 1.0 Transitional//EN” “http://www.w3.org/TR/xhtml1/DTD/xhtml1-transitional.dtd”>

  3. <script runat=“server”>
  4.     protected void Button2_Click(object sender, System.EventArgs e)
  5.     {
  6.          Button1.Width = 200;
  7.     }
  8.     protected void Button3_Click(object sender, System.EventArgs e)
  9.     {
  10.         Button1.Width = 300;
  11.     }
  12. </script>

  13. <html xmlns=“http://www.w3.org/1999/xhtml”>
  14. <head id=“Head1″ runat=“server”>
  15.     <title>How to set, change Button width programmatically</title>
  16. </head>
  17. <body>
  18.     <form id=“form1″ runat=“server”>
  19.     <div>
  20.         <h2 style=“color:Red”>Button Example: Width</h2>
  21.         <asp:Button
  22.              ID=“Button1″
  23.              runat=“server”
  24.              Text=“Test Button Width”
  25.              ForeColor=“SaddleBrown”
  26.              Font-Bold=“true”
  27.              Height=“30″
  28.              />
  29.         <br /><br />
  30.         <asp:Button
  31.              ID=“Button2″
  32.              runat=“server”
  33.              Text=“Button Width 200″
  34.              OnClick=“Button2_Click”
  35.              />
  36.         <asp:Button
  37.              ID=“Button3″
  38.              runat=“server”
  39.              Text=“Button Width 300″
  40.              OnClick=“Button3_Click”
  41.              />
  42.     </div>
  43.     </form>
  44. </body>
  45. </html>


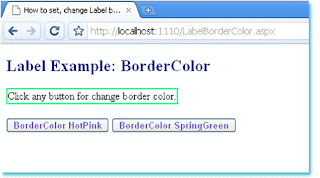
Change Label border color Programmatically in ASP.NET

Change Label border color Programmatically in ASP.NET
  1. <%@ Page Language=“C#” %>

  2. <!DOCTYPE html PUBLIC “-//W3C//DTD XHTML 1.0 Transitional//EN” “http://www.w3.org/TR/xhtml1/DTD/xhtml1-transitional.dtd”>

  3. <script runat=“server”>
  4.     protected void Button1_Click(object sender, System.EventArgs e)
  5.     {
  6.         Label1.BorderColor = System.Drawing.Color.HotPink;
  7.     }
  8.     protected void Button2_Click(object sender, System.EventArgs e)
  9.     {
  10.         Label1.BorderColor = System.Drawing.Color.SpringGreen;
  11.     }
  12. </script>

  13. <html xmlns=“http://www.w3.org/1999/xhtml”>
  14. <head id=“Head1″ runat=“server”>
  15.     <title>How to set, change Label border color programmatically</title>
  16. </head>
  17. <body>
  18.     <form id=“form1″ runat=“server”>
  19.     <div>
  20.         <h2 style=“color:Navy”>Label Example: BorderColor</h2>
  21.         <asp:Label
  22.              ID=“Label1″
  23.              runat=“server”
  24.              Text=“Click any button for change border color.”
  25.              BorderWidth=“2″
  26.              >
  27.         </asp:Label>
  28.         <br /><br />
  29.         <asp:Button
  30.              ID=“Button1″
  31.              runat=“server”
  32.              ForeColor=“SlateBlue”
  33.              Text=“BorderColor HotPink”
  34.              OnClick=“Button1_Click”
  35.              Font-Bold=“true”
  36.              />
  37.         <asp:Button
  38.              ID=“Button2″
  39.              runat=“server”
  40.              Font-Bold=“true”
  41.              ForeColor=“SlateBlue”
  42.              Text=“BorderColor SpringGreen”
  43.              OnClick=“Button2_Click”
  44.              />
  45.     </div>
  46.     </form>
  47. </body>
  48. </html>


How to use Associated control Id in ASP.NET Label

How to use Associated control Id in ASP.NET Label

  1. <%@ Page Language=“C#” %>

  2. <!DOCTYPE html PUBLIC “-//W3C//DTD XHTML 1.0 Transitional//EN” “http://www.w3.org/TR/xhtml1/DTD/xhtml1-transitional.dtd”>

  3. <script runat=“server”>

  4. </script>

  5. <html xmlns=“http://www.w3.org/1999/xhtml”>
  6. <head id=“Head1″ runat=“server”>
  7.     <title>How to use associated control id (AssociatedControlID) in Label</title>
  8. </head>
  9. <body>
  10.     <form id=“form1″ runat=“server”>
  11.     <div>
  12.         <h2 style=“color:Navy”>Label Example: AssociatedControlID</h2>
  13.         <asp:Label
  14.              ID=“Label1″
  15.              runat=“server”
  16.              ForeColor=“CadetBlue”
  17.              Text=“<u>U</u>ser Name”
  18.              ToolTip=“Color label”
  19.              AccessKey=“U”
  20.              AssociatedControlID=“TextBox1″
  21.              >
  22.         </asp:Label>
  23.         <asp:TextBox
  24.              ID=“TextBox1″
  25.              runat=“server”
  26.              BackColor=“SeaGreen”
  27.              ForeColor=“AliceBlue”
  28.              >
  29.         </asp:TextBox>
  30.     </div>
  31.     </form>
  32. </body>
  33. </html>


How to use tool tip (ToolTip) in ASP.Net Label

  1. <%@ Page Language=“C#” %>
  2. <!DOCTYPE html PUBLIC “-//W3C//DTD XHTML 1.0 Transitional//EN” “http://www.w3.org/TR/xhtml1/DTD/xhtml1-transitional.dtd”>
  3. <script runat=“server”>
  4. </script>
  5. <html xmlns=“http://www.w3.org/1999/xhtml”>
  6. <head id=“Head1″ runat=“server”>
  7.     <title>How to use tool tip (ToolTip) in Label</title>
  8. </head>
  9. <body>
  10.     <form id=“form1″ runat=“server”>
  11.     <div>
  12.         <h2 style=“color:Navy”>Label Example: ToolTip</h2>
  13.         <asp:Label
  14.              ID=“Label1″
  15.              runat=“server”
  16.              ForeColor=“OrangeRed”
  17.              BackColor=“LightCyan”
  18.              Font-Size=“X-Large”
  19.              Text=“DodgerBlue”
  20.              ToolTip=“Color label”
  21.              >
  22.         </asp:Label>
  23.         <br /><br />
  24.         <asp:Label
  25.              ID=“Label2″
  26.              runat=“server”
  27.              ForeColor=“Snow”
  28.              BackColor=“DarkCyan”
  29.              Font-Size=“X-Large”
  30.              Text=“XmlDataSource”
  31.              ToolTip=“asp.net control”
  32.              >
  33.         </asp:Label>
  34.     </div>
  35.     </form>
  36. </body>
  37. </html>


How to use theme and skin in ASP.NET Label

How to use theme and skin in ASP.NET Label
  1. <%@ Page Language=“C#” Theme=“Blue” %>

  2. <!DOCTYPE html PUBLIC “-//W3C//DTD XHTML 1.0 Transitional//EN” “http://www.w3.org/TR/xhtml1/DTD/xhtml1-transitional.dtd”>

  3. <script runat=“server”>

  4. </script>

  5. <html xmlns=“http://www.w3.org/1999/xhtml”>
  6. <head id=“Head1″ runat=“server”>
  7.     <title>How to use theme and skin in Label</title>
  8. </head>
  9. <body>
  10.     <form id=“form1″ runat=“server”>
  11.     <div>
  12.         <h2 style=“color:Red”>Label Example: Theme</h2>
  13.         <asp:Label
  14.              ID=“Label1″
  15.              runat=“server”
  16.              Text=“This Label using theme.”
  17.              BackColor=“DarkGreen”
  18.              ForeColor=“FloralWhite”
  19.              Font-Size=“X-Large”
  20.              Font-Italic=“true”
  21.              BorderColor=“LawnGreen”
  22.              BorderWidth=“2″
  23.              >
  24.         </asp:Label>
  25.     </div>
  26.     </form>
  27. </body>
  28. </html>


How to hide visible ASP.NET CheckBox Programmatically

How to hide visible ASP.NET CheckBox Programmatically

  1. <%@ Page Language=“C#” %>

  2. <!DOCTYPE html PUBLIC “-//W3C//DTD XHTML 1.0 Transitional//EN” “http://www.w3.org/TR/xhtml1/DTD/xhtml1-transitional.dtd”>

  3. <script runat=“server”>
  4.     protected void Button1_Click(object sender, System.EventArgs e)
  5.     {
  6.         CheckBox1.Visible = false;
  7.         Label1.Text = “CheckBox Hide.”;
  8.     }
  9.     protected void Button2_Click(object sender, System.EventArgs e)
  10.     {
  11.         CheckBox1.Visible = true;
  12.         Label1.Text = “CheckBox Visible.”;
  13.     }
  14. </script>

  15. <html xmlns=“http://www.w3.org/1999/xhtml”>
  16. <head id=“Head1″ runat=“server”>
  17.     <title>How to hide, visible CheckBox programmatically</title>
  18. </head>
  19. <body>
  20.     <form id=“form1″ runat=“server”>
  21.     <div>
  22.         <h2 style=“color:Green”>asp.net CheckBox example: Hide, Visible</h2>
  23.         <asp:Label
  24.              ID=“Label1″
  25.              runat=“server”
  26.              Font-Size=“Large”
  27.              ForeColor=“Violet”
  28.              >
  29.         </asp:Label>
  30.         <br /><br />
  31.         <asp:CheckBox
  32.              ID=“CheckBox1″
  33.              runat=“server”
  34.              Text=“Check The CheckBox.”
  35.              AutoPostBack=“false”
  36.              ForeColor=“Tomato”
  37.              />
  38.         <br /><br />
  39.         <asp:Button
  40.              ID=“Button1″
  41.              runat=“server”
  42.              ForeColor=“Violet”
  43.              Text=“Hide CheckBox”
  44.              OnClick=“Button1_Click”
  45.              Font-Bold=“true”
  46.              />
  47.         <asp:Button
  48.              ID=“Button2″
  49.              runat=“server”
  50.              Font-Bold=“true”
  51.              ForeColor=“Violet”
  52.              Text=“Visible CheckBox”
  53.              OnClick=“Button2_Click”
  54.              />
  55.     </div>
  56.     </form>
  57. </body>
  58. </html>


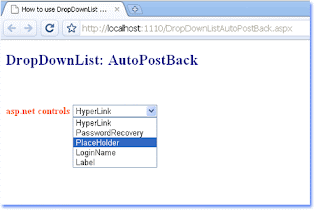
How to use DropDownList AutoPostBack in ASP.NET c#

How to use DropDownList AutoPostBack in ASP.NET c#
  1. <%@ Page Language=“C#” %>

  2. <!DOCTYPE html PUBLIC “-//W3C//DTD XHTML 1.0 Transitional//EN” “http://www.w3.org/TR/xhtml1/DTD/xhtml1-transitional.dtd”>

  3. <script runat=“server”>
  4.     protected void DropDownList1_SelectedIndexChanged(object sender, System.EventArgs e)
  5.     {
  6.         Label1.Text = “You Selected: “ + DropDownList1.SelectedItem.Text;
  7.     }
  8. </script>

  9. <html xmlns=“http://www.w3.org/1999/xhtml”>
  10. <head id=“Head1″ runat=“server”>
  11.     <title>How to use DropDownList AutoPostBack feature</title>
  12. </head>
  13. <body>
  14.     <form id=“form1″ runat=“server”>
  15.     <div>
  16.         <h2 style=“color:Navy”>DropDownList: AutoPostBack</h2>
  17.         <asp:Label
  18.              ID=“Label1″
  19.              runat=“server”
  20.              Font-Bold=“true”
  21.              ForeColor=“Purple”
  22.              Font-Size=“Large”
  23.              >
  24.         </asp:Label>
  25.         <br /><br />
  26.         <asp:Label
  27.              ID=“Label2″
  28.              runat=“server”
  29.              Font-Bold=“true”
  30.              ForeColor=“OrangeRed”
  31.              Text=“asp.net controls”
  32.              >
  33.         </asp:Label>
  34.         <asp:DropDownList
  35.              ID=“DropDownList1″
  36.              runat=“server”
  37.              AutoPostBack=“true”
  38.              OnSelectedIndexChanged=“DropDownList1_SelectedIndexChanged”
  39.              >
  40.              <asp:ListItem>HyperLink</asp:ListItem>
  41.              <asp:ListItem>PasswordRecovery</asp:ListItem>
  42.              <asp:ListItem>PlaceHolder</asp:ListItem>
  43.              <asp:ListItem>LoginName</asp:ListItem>
  44.              <asp:ListItem>Label</asp:ListItem>
  45.         </asp:DropDownList>
  46.     </div>
  47.     </form>
  48. </body>
  49. </html>


How to use theme and skin in ASP.NET DropDownList

How to use theme and skin in ASP.NET DropDownList

  1. <%@ Page Language=“C#” Theme=“Red” %>

  2. <!DOCTYPE html PUBLIC “-//W3C//DTD XHTML 1.0 Transitional//EN” “http://www.w3.org/TR/xhtml1/DTD/xhtml1-transitional.dtd”>

  3. <script runat=“server”>

  4. </script>

  5. <html xmlns=“http://www.w3.org/1999/xhtml”>
  6. <head id=“Head1″ runat=“server”>
  7.     <title>How to use theme and skin in DropDownList</title>
  8. </head>
  9. <body>
  10.     <form id=“form1″ runat=“server”>
  11.     <div>
  12.         <h2 style=“color:Green”>DropDownList: Using Theme</h2>
  13.         <asp:Label
  14.              ID=“Label1″
  15.              runat=“server”
  16.              Font-Bold=“true”
  17.              ForeColor=“DarkBlue”
  18.              Text=“Color List”
  19.              >
  20.         </asp:Label>
  21.         <asp:DropDownList
  22.              ID=“DropDownList1″
  23.              runat=“server”
  24.              >
  25.              <asp:ListItem>DarkGrey</asp:ListItem>
  26.              <asp:ListItem>DarkKhaki</asp:ListItem>
  27.              <asp:ListItem>DarkSlateGray</asp:ListItem>
  28.              <asp:ListItem>DarkTurquoise</asp:ListItem>
  29.              <asp:ListItem>DarkSlateBlue</asp:ListItem>
  30.         </asp:DropDownList>
  31.     </div>
  32.     </form>
  33. </body>
  34. </html>


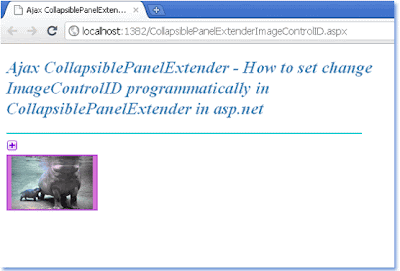
CollapsiblePanelExtender ImageControlID in ASP.NET Ajax

Ajax Collapsible Panel Extender – How to set change Image Control ID programmatically in Collapsible Panel Extender

  1. <%@ Page Language=“C#” AutoEventWireup=“true” %>

  2. <%@ Register Assembly=“AjaxControlToolkit” Namespace=“AjaxControlToolkit” TagPrefix=“cc1″ %>

  3. <!DOCTYPE html PUBLIC “-//W3C//DTD XHTML 1.0 Transitional//EN” “http://www.w3.org/TR/xhtml1/DTD/xhtml1-transitional.dtd”>
  4. <script runat=“server”>
  5.     protected void Page_Load(object sender, EventArgs e)
  6.     {
  7.         CollapsiblePanelExtender1.ImageControlID = “Image1″;
  8.     }
  9. </script>
  10. <html xmlns=“http://www.w3.org/1999/xhtml” >
  11. <head id=“Head1″ runat=“server”>
  12.     <title>Ajax CollapsiblePanelExtender - How to set change ImageControlID programmatically in CollapsiblePanelExtender</title>
  13. </head>
  14. <body>
  15.     <form id=“form1″ runat=“server”>
  16.     <div>
  17.         <h2 style=“color:SteelBlue; font-style:italic;”>
  18.             Ajax CollapsiblePanelExtender - How to set change
  19.             <br /> ImageControlID programmatically in
  20.             <br /> CollapsiblePanelExtender in asp.net
  21.         </h2>
  22.         <hr width=“500″ align=“left” color=“DarkTurquoise” />
  23.         <asp:ScriptManager
  24.             ID=“ScriptManager1″
  25.             runat=“server”
  26.             >
  27.         </asp:ScriptManager>
  28.         <cc1:CollapsiblePanelExtender
  29.             ID=“CollapsiblePanelExtender1″
  30.             runat=“server”
  31.             TargetControlID=“Panel2″
  32.             ExpandControlID=“Panel1″
  33.             CollapseControlID=“Panel1″
  34.             Collapsed=“true”
  35.             ExpandedImage=“~/Image/Expand.gif”
  36.             CollapsedImage=“~/Image/Collapse.gif”
  37.             >
  38.         </cc1:CollapsiblePanelExtender>
  39.         <asp:Image ID=“Image1″ runat=“server” />
  40.         <br />
  41.         <asp:Panel
  42.             ID=“Panel1″
  43.             runat=“server”
  44.             Width=“125″
  45.             BackColor=“Orchid”
  46.             BorderColor=“MediumOrchid”
  47.             BorderWidth=“2″
  48.             HorizontalAlign=“Center”
  49.             BorderStyle=“Solid”
  50.             >
  51.             <asp:Image
  52.                 ID=“Image2″
  53.                 runat=“server”
  54.                 ImageUrl=“~/Image/Hippopotamus.jpg”
  55.                 Height=“75″
  56.                 />
  57.         </asp:Panel>
  58.         <asp:Panel
  59.             ID=“Panel2″
  60.             runat=“server”
  61.             Width=“550″
  62.             BorderColor=“Purple”
  63.             BorderWidth=“2″
  64.             BackColor=“MediumPurple”
  65.             HorizontalAlign=“Center”
  66.             >
  67.             <asp:Image
  68.                 ID=“Image3″
  69.                 runat=“server”
  70.                 ImageUrl=“~/Image/Hippopotamus.jpg”
  71.                 Height=“325″
  72.                 />
  73.         </asp:Panel>
  74.     </div>
  75.     </form>
  76. </body>
  77. </html>


How to use Rating OnChanged event in asp.net ajax

Ajax Rating – How to use OnChanged event in asp.net Rating

  1. <%@ Page Language=“C#” AutoEventWireup=“true” %>

  2. <%@ Register Assembly=“AjaxControlToolkit” Namespace=“AjaxControlToolkit” TagPrefix=“asp” %>

  3. <!DOCTYPE html PUBLIC “-//W3C//DTD XHTML 1.0 Transitional//EN” “http://www.w3.org/TR/xhtml1/DTD/xhtml1-transitional.dtd”>
  4. <script runat=“server”>
  5.     protected void Rating1_Changed(object sender, EventArgs e)
  6.     {
  7.         int ratingValue = Rating1.CurrentRating;
  8.         if (ratingValue <= 3)
  9.         {
  10.             Label1.ForeColor = System.Drawing.Color.Red;
  11.         }
  12.         else
  13.         {
  14.             Label1.ForeColor = System.Drawing.Color.Green;
  15.         }
  16.         Label1.Text = “You Rated: “ + ratingValue;
  17.     }
  18. </script>

  19. <html xmlns=“http://www.w3.org/1999/xhtml”>
  20. <head id=“Head1″ runat=“server”>
  21.     <title>Ajax Rating - How to use OnChanged event in asp.net Rating</title>
  22.     <style type=“text/css”>
  23.         .StarCss {
  24.             background-image: url(/Image/star.png);
  25.             height:24px;
  26.             width:24px;
  27.         }
  28.         .FilledStarCss {
  29.             background-image: url(/Image/filledstar.png);
  30.             height:24px;
  31.             width:24px;
  32.         }
  33.         .EmptyStarCss {
  34.             background-image: url(/Image/star.png);
  35.             height:24px;
  36.             width:24px;
  37.         }
  38.         .WaitingStarCss {
  39.             background-image: url(/Image/waitingstar.png);
  40.             height:24px;
  41.             width:24px;
  42.         }
  43.     </style>

  44. </head>
  45. <body>
  46.     <form id=“form1″ runat=“server”>
  47.     <div>
  48.         <h2 style=“color:DarkBlue; font-style:italic;”>
  49.             ASP.NET Ajax Rating - How to use OnChanged
  50.             <br /> event in asp.net Rating
  51.         </h2>
  52.         <hr width=“500″ align=“left” color=“LightBlue” />
  53.         <asp:ToolkitScriptManager ID=“ToolkitScriptManager1″ runat=“server”>
  54.         </asp:ToolkitScriptManager>
  55.         <table border=“0″ cellpadding=“4″ cellspacing=“4″>
  56.             <tr>
  57.                 <td>
  58.                     <asp:Image
  59.                         ID=“Image1″
  60.                         runat=“server”
  61.                         ImageUrl=“~/Image/RedBird.jpg”
  62.                         Height=“250″
  63.                         />
  64.                 </td>
  65.                 <td>
  66.                     <asp:Label
  67.                         ID=“Label1″
  68.                         runat=“server”
  69.                         Font-Size=“X-Large”
  70.                         Font-Italic=“true”
  71.                         Font-Names=“Comic Sans MS”
  72.                         >
  73.                     </asp:Label>
  74.                     <br /><br />
  75.                     <asp:Label
  76.                         ID=“Label2″
  77.                         runat=“server”
  78.                         ForeColor=“SandyBrown”
  79.                         Font-Size=“Large”
  80.                         Text=“Rate this image”
  81.                         >
  82.                     </asp:Label>
  83.                     <br />
  84.                     <asp:Rating
  85.                         ID=“Rating1″
  86.                         runat=“server”
  87.                         StarCssClass=“StarCss”
  88.                         FilledStarCssClass=“FilledStarCss”
  89.                         EmptyStarCssClass=“EmptyStarCss”
  90.                         WaitingStarCssClass=“WaitingStarCss”
  91.                         AutoPostBack=“true”
  92.                         OnChanged=“Rating1_Changed”
  93.                         >
  94.                     </asp:Rating>
  95.                 </td>
  96.             </tr>
  97.         </table>
  98.     </div>
  99.     </form>
  100. </body>
  101. </html>