Tuesday, 29 July 2014

ComboBox Append DataBound Items in ASP.NET Ajax

Ajax ComboBox – How to use AppendDataBoundItems in asp.net ComboBox
  1. <%@ Page Language=“C#” AutoEventWireup=“true” %>

  2. <%@ Register Assembly=“AjaxControlToolkit” Namespace=“AjaxControlToolkit” TagPrefix=“asp” %>

  3. <!DOCTYPE html PUBLIC “-//W3C//DTD XHTML 1.0 Transitional//EN” “http://www.w3.org/TR/xhtml1/DTD/xhtml1-transitional.dtd”>
  4. <script runat=“server”>
  5.     void ComboBoxDataBind()
  6.     {
  7.         string[] Colors = { “Red”, “Green”, “Blue” };
  8.         ComboBox1.DataSource = Colors;
  9.         ComboBox1.DataBind();
  10.     }

  11.     protected void Button1_Click(object sender, EventArgs e)
  12.     {
  13.         ComboBox1.AppendDataBoundItems = true;
  14.         ComboBoxDataBind();
  15.         Label1.Text = “AppendDataBoundItems Now: True”;
  16.     }

  17.     protected void Button2_Click(object sender, EventArgs e)
  18.     {
  19.         ComboBox1.AppendDataBoundItems = false;
  20.         ComboBoxDataBind();
  21.         Label1.Text = “AppendDataBoundItems Now: False”;
  22.     }

  23. </script>

  24. <html xmlns=“http://www.w3.org/1999/xhtml”>
  25. <head id=“Head1″ runat=“server”>
  26.     <title>Ajax ComboBox - How to use AppendDataBoundItems in asp.net ComboBox</title>
  27. </head>
  28. <body>
  29.     <form id=“form1″ runat=“server”>
  30.     <div>
  31.         <h2 style=“color:DarkBlue; font-style:italic;”>
  32.             ASP.NET Ajax ComboBox - How to use
  33.             <br />AppendDataBoundItems in asp.net ComboBox
  34.         </h2>
  35.         <hr width=“475″ align=“left” color=“LightBlue” />
  36.         <asp:ToolkitScriptManager ID=“ToolkitScriptManager1″ runat=“server”>
  37.         </asp:ToolkitScriptManager>
  38.         <asp:Label
  39.             ID=“Label1″
  40.             runat=“server”
  41.             Font-Size=“Large”
  42.             ForeColor=“Green”
  43.             >
  44.         </asp:Label>
  45.         <br /><br />
  46.         <asp:ComboBox
  47.             ID=“ComboBox1″
  48.             runat=“server”
  49.             DropDownStyle=“DropDown”
  50.             AutoCompleteMode=“None”
  51.             CaseSensitive=“false”
  52.             RenderMode=“Block”
  53.             AutoPostBack=“false”
  54.             Font-Names=“Comic Sans MS”
  55.             Font-Size=“Medium”
  56.             >
  57.             <asp:ListItem Text=“White”></asp:ListItem>
  58.         </asp:ComboBox>
  59.         <br /><br /><br />
  60.         <br /><br />
  61.         <asp:Button
  62.             ID=“Button1″
  63.             runat=“server”
  64.             OnClick=“Button1_Click”
  65.             Text=“Populate ComboBox: AppendDataBoundItems True”
  66.             Height=“45″
  67.             Font-Bold=“true”
  68.             ForeColor=“DodgerBlue”
  69.             />
  70.         <br />
  71.         <asp:Button
  72.             ID=“Button2″
  73.             runat=“server”
  74.             OnClick=“Button2_Click”
  75.             Text=“Populate ComboBox: AppendDataBoundItems False”
  76.             Height=“45″
  77.             Font-Bold=“true”
  78.             ForeColor=“DodgerBlue”
  79.             />
  80.     </div>
  81.     </form>
  82. </body>
  83. </html>


Using Control Parameter with Details View in ASP.NET

ASP.NET ControlParameter and DetailsView example

  1. <%@ Page Language=“C#” %>

  2. <!DOCTYPE html PUBLIC “-//W3C//DTD XHTML 1.0 Transitional//EN” “http://www.w3.org/TR/xhtml1/DTD/xhtml1-transitional.dtd”>

  3. <script runat=“server”>

  4. </script>

  5. <html xmlns=“http://www.w3.org/1999/xhtml”>
  6. <head runat=“server”>
  7.     <title>asp.net ControlParameter and DetailsView example</title>
  8. </head>
  9. <body>
  10.     <form id=“form1″ runat=“server”>
  11.     <div>
  12.         <h2 style=“color:Teal”>ControlParameter and DetailsView</h2>
  13.         <asp:SqlDataSource
  14.              ID=“SqlDataSource1″
  15.              runat=“server”
  16.              ConnectionString=“<%$ ConnectionStrings:NorthwindConnectionString %>”
  17.              SelectCommand=“SELECT ProductID, ProductName FROM Products”
  18.              >
  19.         </asp:SqlDataSource>
  20.         <asp:SqlDataSource
  21.              ID=“SqlDataSource2″
  22.              runat=“server”
  23.              ConnectionString=“<%$ ConnectionStrings:NorthwindConnectionString %>”
  24.              SelectCommand=“SELECT ProductID, ProductName, UnitPrice FROM Products WHERE ProductID=@ProductID”
  25.              >
  26.             <SelectParameters>
  27.                 <asp:ControlParameter ControlID=“DropDownList1″ Name=“ProductID” PropertyName=“SelectedValue” />
  28.             </SelectParameters>
  29.         </asp:SqlDataSource>
  30.         <asp:Label ID=“Label1″ runat=“server” Text=“Product” AssociatedControlID=“DropDownList1″ ForeColor=“SteelBlue” Font-Bold=“true”></asp:Label>
  31.         <asp:DropDownList
  32.              ID=“DropDownList1″
  33.              runat=“server”
  34.              DataSourceID=“SqlDataSource1″
  35.              DataTextField=“ProductName”
  36.              DataValueField=“ProductID”
  37.              AutoPostBack=“true”
  38.              ForeColor=“HotPink”
  39.              >
  40.         </asp:DropDownList>
  41.         <br /><br />
  42.         <asp:Label ID=“Label2″ runat=“server” Text=“Product Details” Font-Bold=“true” ForeColor=“Gray”></asp:Label>
  43.         <asp:DetailsView
  44.              ID=“DetailsView1″
  45.              runat=“server”
  46.              DataSourceID=“SqlDataSource2″
  47.              BackColor=“Snow”
  48.              ForeColor=“IndianRed”
  49.              BorderStyle=“Double”
  50.              BorderColor=“SteelBlue”
  51.              >
  52.         </asp:DetailsView>
  53.     </div>
  54.     </form>
  55. </body>
  56. </html>


ASP.NET DetailsView and SqlDataSource example – Using Insert, Edit

DetailsView and SqlDataSource example: Using Insert, Edit

  1. <%@ Page Language=“C#” %>

  2. <!DOCTYPE html PUBLIC “-//W3C//DTD XHTML 1.0 Transitional//EN” “http://www.w3.org/TR/xhtml1/DTD/xhtml1-transitional.dtd”>

  3. <script runat=“server”>

  4. </script>

  5. <html xmlns=“http://www.w3.org/1999/xhtml”>
  6. <head runat=“server”>
  7.     <title>DetailsView and SqlDataSource example: Using Insert, Edit</title>
  8. </head>
  9. <body>
  10.     <form id=“form1″ runat=“server”>
  11.     <div>

  12.         <asp:DetailsView ID=“DetailsView1″ runat=“server” AllowPaging=“True”
  13.             AutoGenerateRows=“False” DataKeyNames=“CustomerID”
  14.             DataSourceID=“SqlDataSource1″ Height=“50px” Width=“125px”>
  15.             <Fields>
  16.                 <asp:BoundField DataField=“CustomerID” HeaderText=“CustomerID” ReadOnly=“True”
  17.                     SortExpression=“CustomerID” />
  18.                 <asp:BoundField DataField=“CompanyName” HeaderText=“CompanyName”
  19.                     SortExpression=“CompanyName” />
  20.                 <asp:BoundField DataField=“ContactName” HeaderText=“ContactName”
  21.                     SortExpression=“ContactName” />
  22.                 <asp:BoundField DataField=“ContactTitle” HeaderText=“ContactTitle”
  23.                     SortExpression=“ContactTitle” />
  24.                 <asp:BoundField DataField=“Address” HeaderText=“Address”
  25.                     SortExpression=“Address” />
  26.                 <asp:BoundField DataField=“City” HeaderText=“City” SortExpression=“City” />
  27.                 <asp:BoundField DataField=“Region” HeaderText=“Region”
  28.                     SortExpression=“Region” />
  29.                 <asp:BoundField DataField=“PostalCode” HeaderText=“PostalCode”
  30.                     SortExpression=“PostalCode” />
  31.                 <asp:BoundField DataField=“Country” HeaderText=“Country”
  32.                     SortExpression=“Country” />
  33.                 <asp:BoundField DataField=“Phone” HeaderText=“Phone” SortExpression=“Phone” />
  34.                 <asp:BoundField DataField=“Fax” HeaderText=“Fax” SortExpression=“Fax” />
  35.                 <asp:CommandField ShowDeleteButton=“False” ShowEditButton=“True”
  36.                     ShowInsertButton=“True” />
  37.             </Fields>
  38.         </asp:DetailsView>
  39.         <asp:SqlDataSource ID=“SqlDataSource1″ runat=“server”
  40.             ConflictDetection=“CompareAllValues”
  41.             ConnectionString=“<%$ ConnectionStrings:NorthwindConnectionString %>”
  42.             InsertCommand=“INSERT INTO [Customers] ([CustomerID], [CompanyName], [ContactName], [ContactTitle], [Address], [City], [Region], [PostalCode], [Country], [Phone], [Fax]) VALUES (@CustomerID, @CompanyName, @ContactName, @ContactTitle, @Address, @City, @Region, @PostalCode, @Country, @Phone, @Fax)”
  43.             OldValuesParameterFormatString=“original_{0}”
  44.             SelectCommand=“SELECT * FROM [Customers]“
  45.             UpdateCommand=“UPDATE [Customers] SET [CompanyName] = @CompanyName, [ContactName] = @ContactName, [ContactTitle] = @ContactTitle, [Address] = @Address, [City] = @City, [Region] = @Region, [PostalCode] = @PostalCode, [Country] = @Country, [Phone] = @Phone, [Fax] = @Fax WHERE [CustomerID] = @original_CustomerID AND [CompanyName] = @original_CompanyName AND [ContactName] = @original_ContactName AND [ContactTitle] = @original_ContactTitle AND [Address] = @original_Address AND [City] = @original_City AND [Region] = @original_Region AND [PostalCode] = @original_PostalCode AND [Country] = @original_Country AND [Phone] = @original_Phone AND [Fax] = @original_Fax”>
  46.             <UpdateParameters>
  47.                 <asp:Parameter Name=“CompanyName” Type=“String” />
  48.                 <asp:Parameter Name=“ContactName” Type=“String” />
  49.                 <asp:Parameter Name=“ContactTitle” Type=“String” />
  50.                 <asp:Parameter Name=“Address” Type=“String” />
  51.                 <asp:Parameter Name=“City” Type=“String” />
  52.                 <asp:Parameter Name=“Region” Type=“String” />
  53.                 <asp:Parameter Name=“PostalCode” Type=“String” />
  54.                 <asp:Parameter Name=“Country” Type=“String” />
  55.                 <asp:Parameter Name=“Phone” Type=“String” />
  56.                 <asp:Parameter Name=“Fax” Type=“String” />
  57.                 <asp:Parameter Name=“original_CustomerID” Type=“String” />
  58.                 <asp:Parameter Name=“original_CompanyName” Type=“String” />
  59.                 <asp:Parameter Name=“original_ContactName” Type=“String” />
  60.                 <asp:Parameter Name=“original_ContactTitle” Type=“String” />
  61.                 <asp:Parameter Name=“original_Address” Type=“String” />
  62.                 <asp:Parameter Name=“original_City” Type=“String” />
  63.                 <asp:Parameter Name=“original_Region” Type=“String” />
  64.                 <asp:Parameter Name=“original_PostalCode” Type=“String” />
  65.                 <asp:Parameter Name=“original_Country” Type=“String” />
  66.                 <asp:Parameter Name=“original_Phone” Type=“String” />
  67.                 <asp:Parameter Name=“original_Fax” Type=“String” />
  68.             </UpdateParameters>
  69.             <InsertParameters>
  70.                 <asp:Parameter Name=“CustomerID” Type=“String” />
  71.                 <asp:Parameter Name=“CompanyName” Type=“String” />
  72.                 <asp:Parameter Name=“ContactName” Type=“String” />
  73.                 <asp:Parameter Name=“ContactTitle” Type=“String” />
  74.                 <asp:Parameter Name=“Address” Type=“String” />
  75.                 <asp:Parameter Name=“City” Type=“String” />
  76.                 <asp:Parameter Name=“Region” Type=“String” />
  77.                 <asp:Parameter Name=“PostalCode” Type=“String” />
  78.                 <asp:Parameter Name=“Country” Type=“String” />
  79.                 <asp:Parameter Name=“Phone” Type=“String” />
  80.                 <asp:Parameter Name=“Fax” Type=“String” />
  81.             </InsertParameters>
  82.         </asp:SqlDataSource>

  83.     </div>
  84.     </form>
  85. </body>
  86. </html>

How to use SqlParameter in asp.net

SqlParameter example: how to use SqlParameter in asp.net
Create a web form name SqlParameterExample.aspx. Now add a GridView control. We populate the GridView control with SqlDataSource Data. But here we filter the data by SqlParameter. In this example we select the NorthWind database Products table data and filter it with SqlParameter product name. The source code of SqlParameterExample.aspx is here.

  1. <%@ Page Language=“C#” %>
  2. <%@ Import Namespace=“System.Data” %>
  3. <%@ Import Namespace=“System.Data.SqlClient” %>
  4. <%@ Import Namespace=“System.Configuration” %>

  5. <!DOCTYPE html PUBLIC “-//W3C//DTD XHTML 1.0 Transitional//EN” “http://www.w3.org/TR/xhtml1/DTD/xhtml1-transitional.dtd”>

  6. <script runat=“server”>
  7.     protected void Page_Load(object sender, System.EventArgs e) {
  8.         if (!Page.IsPostBack) {
  9.             SqlConnection MyConnection;
  10.             SqlCommand MyCommand;
  11.             SqlDataReader MyReader;
  12.             SqlParameter ProductNameParam;

  13.             MyConnection = new SqlConnection();
  14.             MyConnection.ConnectionString = ConfigurationManager.ConnectionStrings["AppConnectionString1"].ConnectionString;

  15.             MyCommand = new SqlCommand();
  16.             MyCommand.CommandText = “SELECT * FROM PRODUCTS WHERE PRODUCTNAME = @PRODUCTNAME”;
  17.             MyCommand.CommandType = CommandType.Text;
  18.             MyCommand.Connection = MyConnection;

  19.             ProductNameParam = new SqlParameter();
  20.             ProductNameParam.ParameterName = “@PRODUCTNAME”;
  21.             ProductNameParam.SqlDbType = SqlDbType.VarChar;
  22.             ProductNameParam.Size = 25;
  23.             ProductNameParam.Direction = ParameterDirection.Input;
  24.             ProductNameParam.Value = “CHAI”;

  25.             MyCommand.Parameters.Add(ProductNameParam);

  26.             MyCommand.Connection.Open();
  27.             MyReader = MyCommand.ExecuteReader(CommandBehavior.CloseConnection);

  28.             GridView1.DataSource = MyReader;
  29.             GridView1.DataBind();

  30.             MyCommand.Dispose();
  31.             MyConnection.Dispose();
  32.         }
  33.     }
  34. </script>

  35. <html xmlns=“http://www.w3.org/1999/xhtml”>
  36. <head runat=“server”>
  37.     <title>SqlParameter example: how to use SqlParameter in asp.net</title>
  38. </head>
  39. <body>
  40.     <form id=“form1″ runat=“server”>
  41.     <div>
  42.         <asp:GridView ID=“GridView1″ runat=“server”>
  43.         </asp:GridView>
  44.     </div>
  45.     </form>
  46. </body>
  47. </html>

How to use DataReader in ASP.NET

DataReader example: how to use DataReader in asp.net

  1. <%@ Page Language=“C#” %>
  2. <%@ Import Namespace=“System.Data” %>
  3. <%@ Import Namespace=“System.Data.SqlClient” %>
  4. <%@ Import Namespace=“System.Configuration” %>

  5. <!DOCTYPE html PUBLIC “-//W3C//DTD XHTML 1.0 Transitional//EN” “http://www.w3.org/TR/xhtml1/DTD/xhtml1-transitional.dtd”>

  6. <script runat=“server”>
  7.     protected void Page_Load(object sender, System.EventArgs e) {
  8.         if (!Page.IsPostBack) {
  9.             SqlConnection MyConnection;
  10.             SqlCommand MyCommand;
  11.             SqlDataReader MyReader;

  12.             MyConnection = new SqlConnection();
  13.             MyConnection.ConnectionString = ConfigurationManager.ConnectionStrings["AppConnectionString1"].ConnectionString;

  14.             MyCommand = new SqlCommand();
  15.             MyCommand.CommandText = “SELECT TOP 10 * From PRODUCTS”;
  16.             MyCommand.CommandType = CommandType.Text;
  17.             MyCommand.Connection = MyConnection;

  18.             MyCommand.Connection.Open();
  19.             MyReader = MyCommand.ExecuteReader(CommandBehavior.CloseConnection);

  20.             GridView1.DataSource = MyReader;
  21.             GridView1.DataBind();

  22.             MyCommand.Dispose();
  23.             MyConnection.Dispose();
  24.         }
  25.     }
  26. </script>

  27. <html xmlns=“http://www.w3.org/1999/xhtml”>
  28. <head runat=“server”>
  29.     <title>DataReader example: how to use DataReader in asp.net</title>
  30. </head>
  31. <body>
  32.     <form id=“form1″ runat=“server”>
  33.     <div>
  34.         <asp:GridView ID=“GridView1″ runat=“server”>
  35.         </asp:GridView>
  36.     </div>
  37.     </form>
  38. </body>
  39. </html>

How to use GridView in ASP.NET

How to use GridView in ASP.NET an  Example
Gridview is a very important control in asp.net. gridview is mainly uses for display tabular data. it also can edit update insert data. you can use it for variuos requirements. this can help you to display and format tabular data very fastest way. we can format the gridview’s nearly all parts as example header, row, alternate row pager etc. even we can place insert,edit,delete button for each row.
In this simple example we create a deafult formatted gridview. we also create a sqldatasource control populate the datasource by a simple database query. we fetch data from northwind databse customer table. finally we populate gridview by that sqldatasource. we set the gridview sorting, paging, auto generate columns true. so sorting, paging, columns names facility are created without much more coding.

  1. <%@ Page Language=“C#” %>

  2. <!DOCTYPE html PUBLIC “-//W3C//DTD XHTML 1.0 Transitional//EN” “http://www.w3.org/TR/xhtml1/DTD/xhtml1-transitional.dtd”>

  3. <script runat=“server”>

  4. </script>

  5. <html xmlns=“http://www.w3.org/1999/xhtml”>
  6. <head runat=“server”>
  7.     <title>GridView example: how to use GridView in asp.net</title>
  8. </head>
  9. <body>
  10.     <form id=“form1″ runat=“server”>
  11.     <div>

  12.         <asp:GridView ID=“GridView1″ runat=“server” AllowPaging=“True”
  13.             AllowSorting=“True” AutoGenerateColumns=“False” DataKeyNames=“CustomerID”
  14.             DataSourceID=“SqlDataSource1″>
  15.             <Columns>
  16.                 <asp:BoundField DataField=“CustomerID” HeaderText=“CustomerID” ReadOnly=“True”
  17.                     SortExpression=“CustomerID” />
  18.                 <asp:BoundField DataField=“CompanyName” HeaderText=“CompanyName”
  19.                     SortExpression=“CompanyName” />
  20.                 <asp:BoundField DataField=“ContactName” HeaderText=“ContactName”
  21.                     SortExpression=“ContactName” />
  22.                 <asp:BoundField DataField=“ContactTitle” HeaderText=“ContactTitle”
  23.                     SortExpression=“ContactTitle” />
  24.                 <asp:BoundField DataField=“Address” HeaderText=“Address”
  25.                     SortExpression=“Address” />
  26.                 <asp:BoundField DataField=“City” HeaderText=“City” SortExpression=“City” />
  27.                 <asp:BoundField DataField=“Region” HeaderText=“Region”
  28.                     SortExpression=“Region” />
  29.                 <asp:BoundField DataField=“PostalCode” HeaderText=“PostalCode”
  30.                     SortExpression=“PostalCode” />
  31.                 <asp:BoundField DataField=“Country” HeaderText=“Country”
  32.                     SortExpression=“Country” />
  33.                 <asp:BoundField DataField=“Phone” HeaderText=“Phone” SortExpression=“Phone” />
  34.                 <asp:BoundField DataField=“Fax” HeaderText=“Fax” SortExpression=“Fax” />
  35.             </Columns>
  36.         </asp:GridView>
  37.         <asp:SqlDataSource ID=“SqlDataSource1″ runat=“server”
  38.             ConnectionString=“<%$ ConnectionStrings:AppConnectionString1 %>”
  39.             SelectCommand=“SELECT * FROM [Customers]“></asp:SqlDataSource>

  40.     </div>
  41.     </form>
  42. </body>
  43. </html>

the above image show the output of this example. here you can see how easily gridview present the tabular data. paging and columns names are hyperlinked. so if you click them it can show next page or sort by specific column.

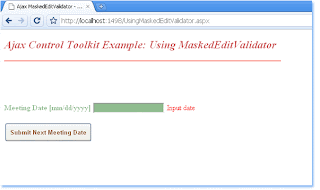
How to use MaskedEditValidator in ASP.NET Ajax

Ajax MaskedEditValidator – How to use MaskedEditValidator in ASP.NET Ajax
  1. <%@ Page Language=“C#” AutoEventWireup=“true” %>

  2. <%@ Register Assembly=“AjaxControlToolkit” Namespace=“AjaxControlToolkit” TagPrefix=“cc1″ %>

  3. <!DOCTYPE html PUBLIC “-//W3C//DTD XHTML 1.0 Transitional//EN” “http://www.w3.org/TR/xhtml1/DTD/xhtml1-transitional.dtd”>
  4. <script runat=“server”>
  5.     protected void Button1_Click(object sender, EventArgs e)
  6.     {
  7.         Label1.Text = “You submitted date: “;
  8.         Label1.Text += Convert.ToDateTime(TextBox1.Text).ToLongDateString();
  9.     }
  10. </script>
  11. <html xmlns=“http://www.w3.org/1999/xhtml” >
  12. <head id=“Head1″ runat=“server”>
  13.     <title>Ajax MaskedEditValidator - How to use MaskedEditValidator in asp.net ajax</title>
  14. </head>
  15. <body>
  16.     <form id=“form1″ runat=“server”>
  17.     <div>
  18.         <h2 style=“color:IndianRed; font-style:italic;”>Ajax Control Toolkit Example: Using MaskedEditValidator</h2>
  19.         <hr width=“600″ align=“left” color=“Salmon” />
  20.         <asp:ScriptManager
  21.             ID=“ScriptManager1″
  22.             runat=“server”
  23.             >
  24.         </asp:ScriptManager>
  25.         <br /><br />
  26.         <asp:Label
  27.             ID=“Label1″
  28.             runat=“server”
  29.             ForeColor=“DeepPink”
  30.             Font-Size=“Large”
  31.             Font-Italic=“true”
  32.             Font-Bold=“true”
  33.             >
  34.         </asp:Label>
  35.         <br /><br />
  36.         <asp:Label
  37.             ID=“Label2″
  38.             runat=“server”
  39.             Text=“Meeting Date [mm/dd/yyyy] “
  40.             ForeColor=“DarkSeaGreen”
  41.             Font-Bold=“true”
  42.             >
  43.         </asp:Label>
  44.         <asp:TextBox
  45.             ID=“TextBox1″
  46.             runat=“server”
  47.             BackColor=“DarkSeaGreen”
  48.             Font-Bold=“true”
  49.             ForeColor=“Snow”
  50.             >
  51.         </asp:TextBox>
  52.         <cc1:MaskedEditExtender
  53.             ID=“MaskedEditExtender1″
  54.             runat=“server”
  55.             TargetControlID=“TextBox1″
  56.             Mask=“99/99/9999″
  57.             MaskType=“Date”
  58.             MessageValidatorTip=“true”
  59.             >
  60.         </cc1:MaskedEditExtender>
  61.         <cc1:MaskedEditValidator
  62.             ID=“MaskedEditValidator1″
  63.             runat=“server”
  64.             ControlToValidate=“TextBox1″
  65.             ControlExtender=“MaskedEditExtender1″
  66.             IsValidEmpty=“false”
  67.             EmptyValueMessage=“Input date”
  68.             InvalidValueMessage=“inputted date not valid”
  69.             >
  70.         </cc1:MaskedEditValidator>
  71.         <br /><br />
  72.         <asp:Button
  73.             ID=“Button1″
  74.             runat=“server”
  75.             Text=“Submit Next Meeting Date”
  76.             Font-Bold=“true”
  77.             ForeColor=“SaddleBrown”
  78.             OnClick=“Button1_Click”
  79.             Height=“40″
  80.             />
  81.     </div>
  82.     </form>
  83. </body>
  84. </html>